The Group Block Reservation Wizard is divided into separate screens for Dates, Room Types, Functions, Packages, Rates, Group Account, Payment, Finish and Post. You will need to move through them until you reach the Functions screen.
Depending on your Property's configuration, you may have the Create a Group Block command available from the Quick Menu.
If not, you can select Create A Group Block from the Reservations Menu.
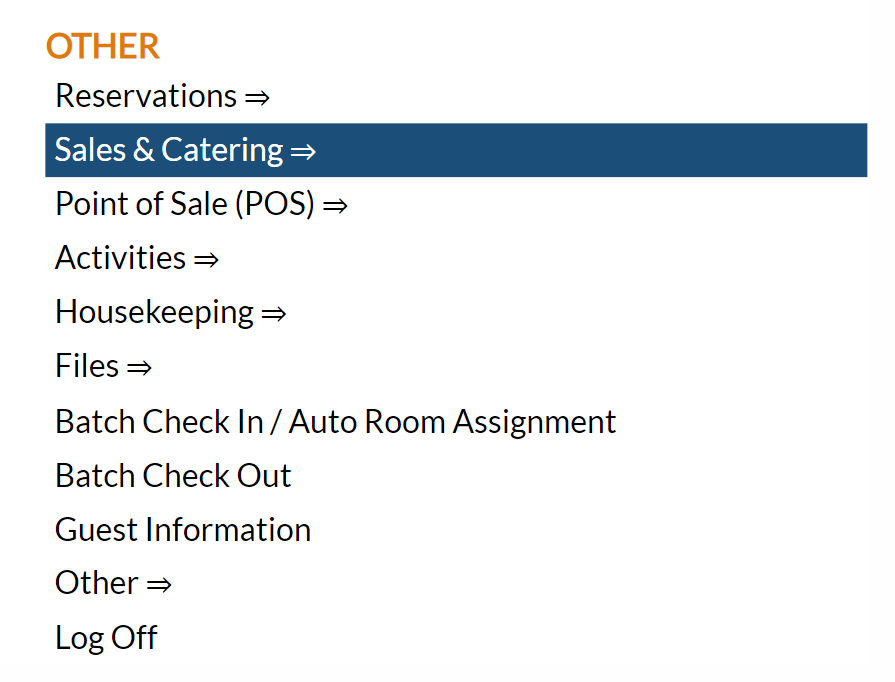
The Reservations Menu may be reached either directly from the Quick Menu, or If you do NOT have a Quick Menu option by using the Full Menu and selecting Reservations => from the Other section.
Click the icon on the left for the Full menu.
This will display the Full menu in a tabular form, with four sections, Registration, Status, Cashier and Other.
From the Other Section, select Reservations =>.
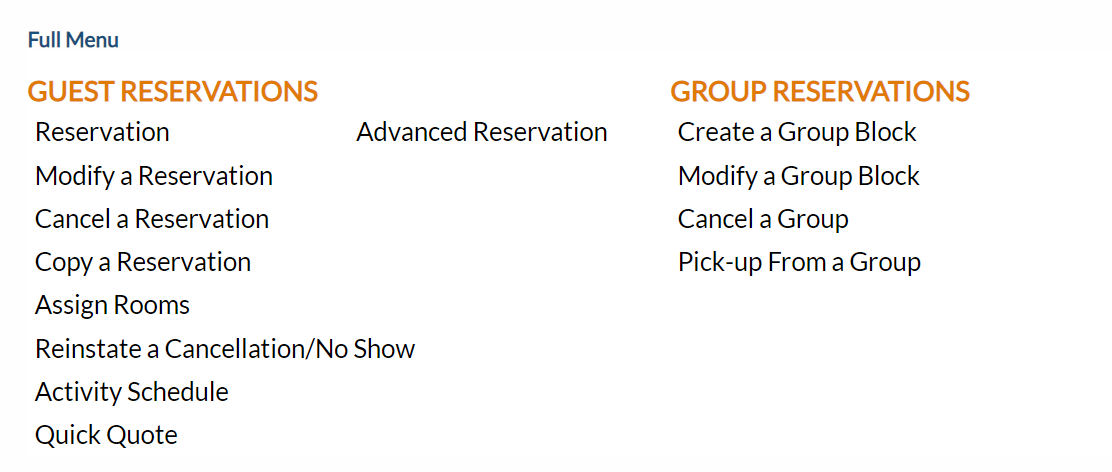
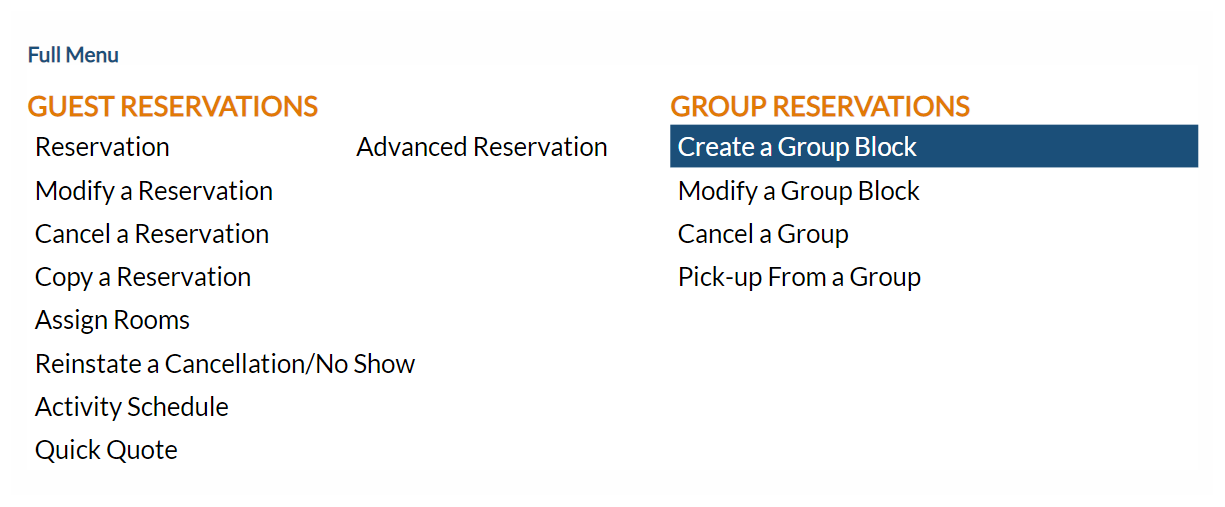
This will display the Reservations Menu.
Click the Create a Group Block command in the Group Reservation section of the Menu.
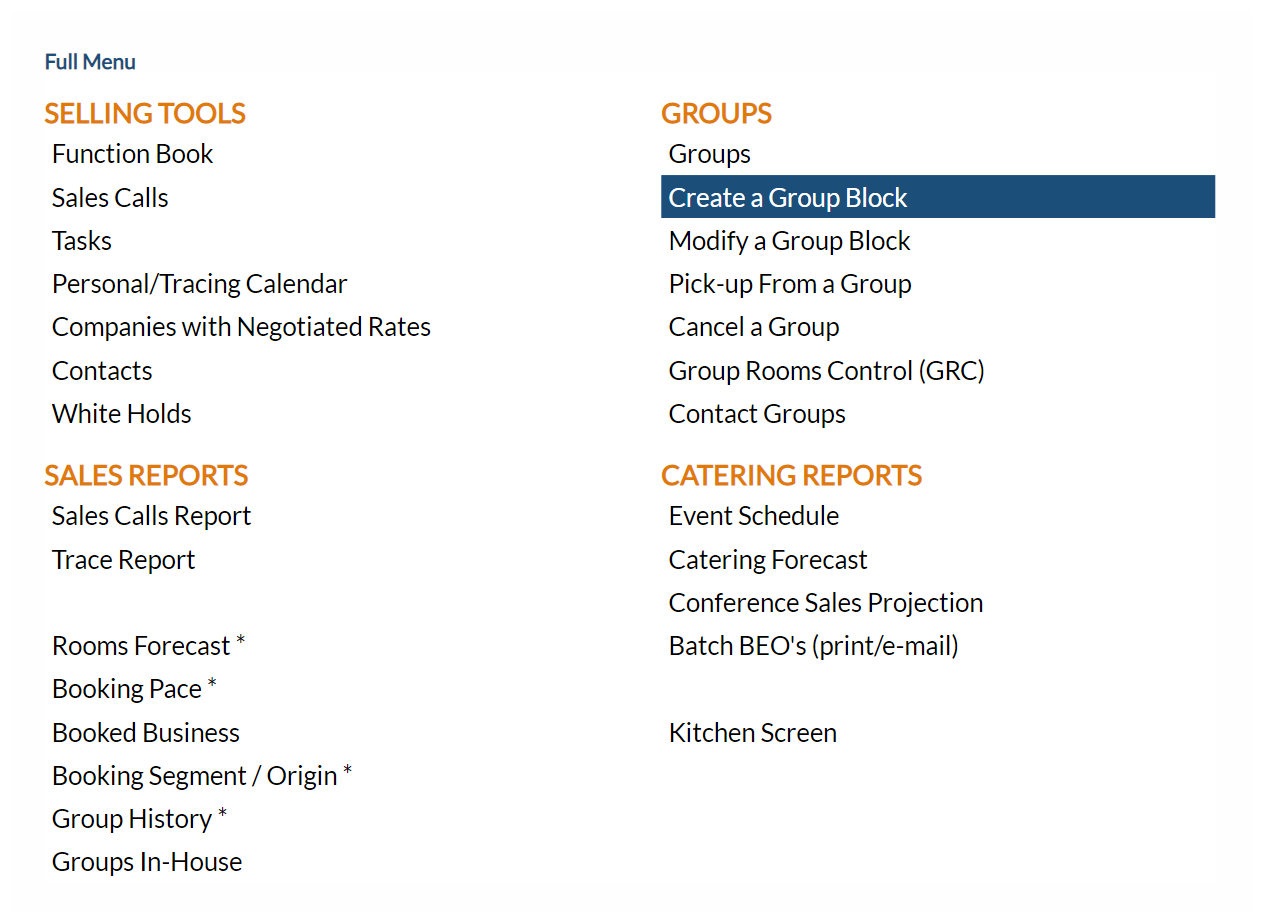
Alternately, IF your Property is using Skyware Systems Sales and Catering system, you can also use the Sales and Catering menu, by clicking on the Create a Group Block command in the Groups section of the Menu.
OR:
From the Main Folio screen, you can make changes to the reservation by clicking the Modify Group button from the local toolbar. This opens the Group Reservation Wizard, on the first screen, Dates.
From here, you can click on the Functions screen in the Wizard as necessary to make any alterations, right up to the Arrival Date.
OR:
The Functions tab shows any functions that are associated with your Group reservation, and allows you to add or edit a Function.
Note: If you have marked a function as the primary function, it will be shown as the first function in the grouping for the particular BEO.
You can add functions to the list by clicking on the "Add" button, which will open the Functions screen page to allow you to create or select functions to add. Clicking on a function already displayed will also take you to the Functions screen, where it can be viewed or edited.
You can REMOVE functions from the list by clicking the delete button to the right of the entry.
OR:
Depending on your Skyware Systems configuration, you may be able to select Function Book directly from the Quick Menu.
The Sales and Catering Menu may be reached either directly from the Quick Menu, or by using the Full Menu and selecting Sales and Catering => from the Other section.
Select Sales and Catering => from the Quick Menu (left side of screen).
OR
Select Sales and Catering => from the Other section of the Full Menu,
Click the icon on the left for the Full menu.
This will display the Full menu in a tabular form, with four sections, Registration, Status, Cashier and Other.
Select Sales and Catering => from the Other section.
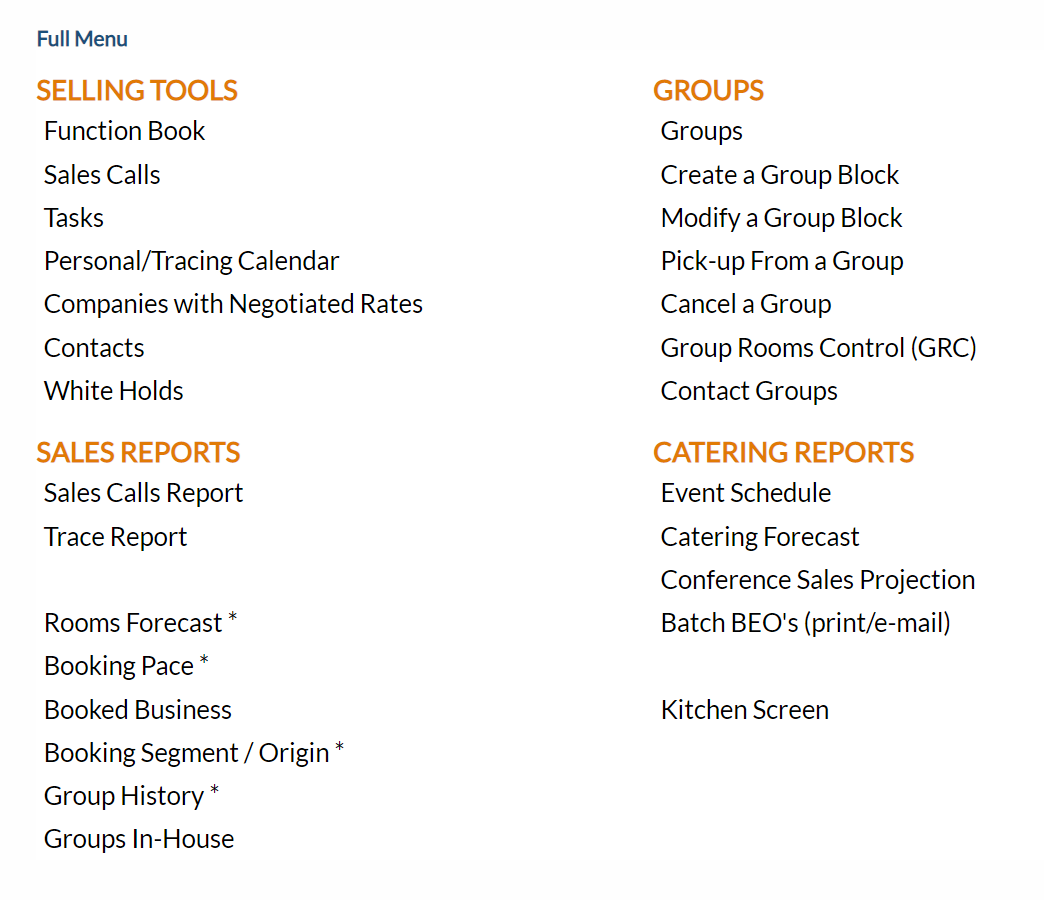
This will display the Sales and Catering menu in a tabular form, with four sections, Selling Tools, Groups, Sales Reports and Catering Reports.
The Function Book command is in the Selling Tools section.
When opened, the Function Book screen will display, for today's date.
Click on an existing function to open the Function screen for that specific function. Edit the function as desired.
Note: Once the function screen has been opened, a NEW function may be generated by clicking on the New icon in the tool bar. HOWEVER, this function will also be associated with the group the existing function is associated with.
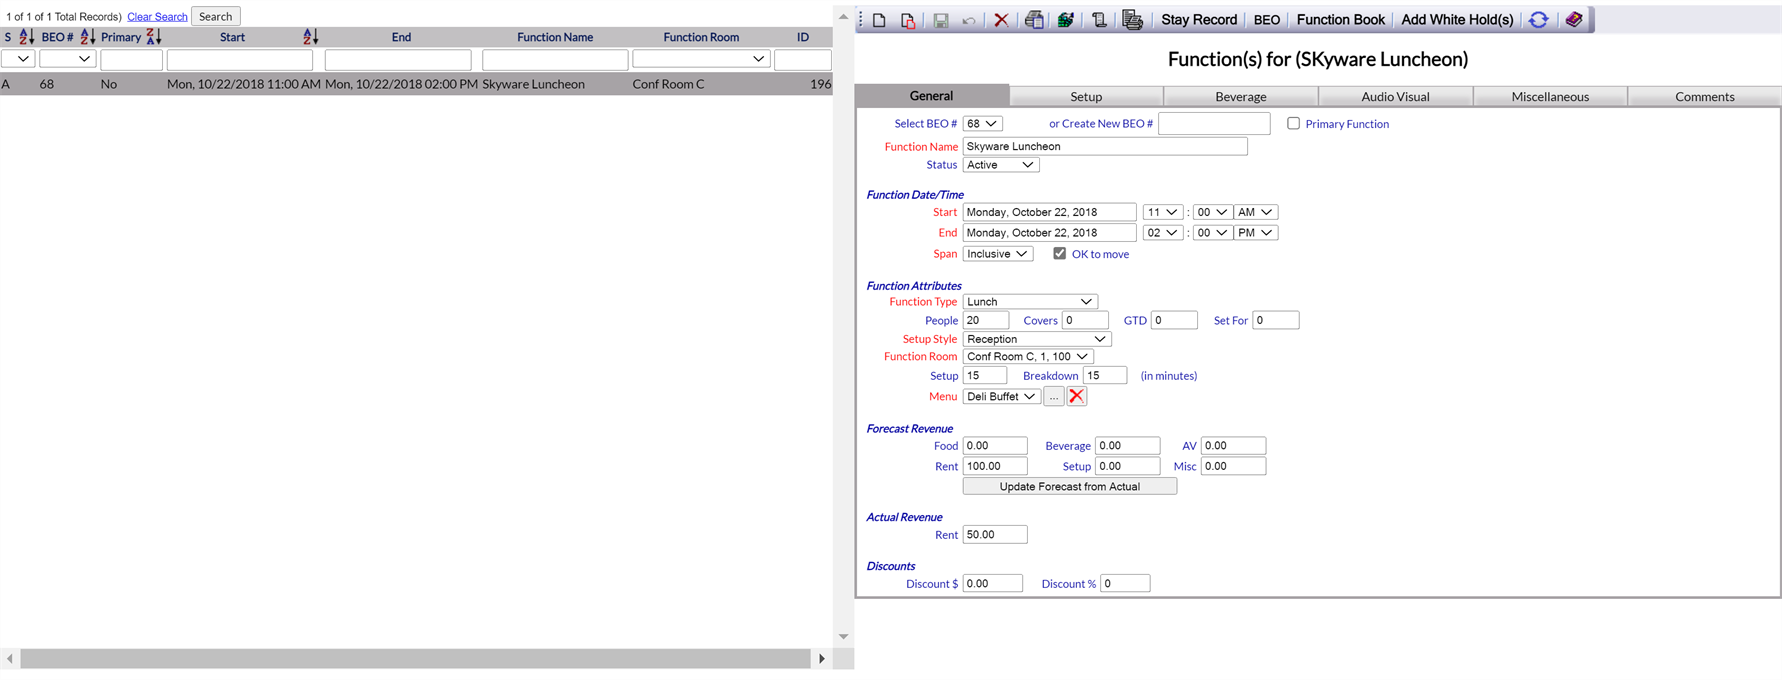
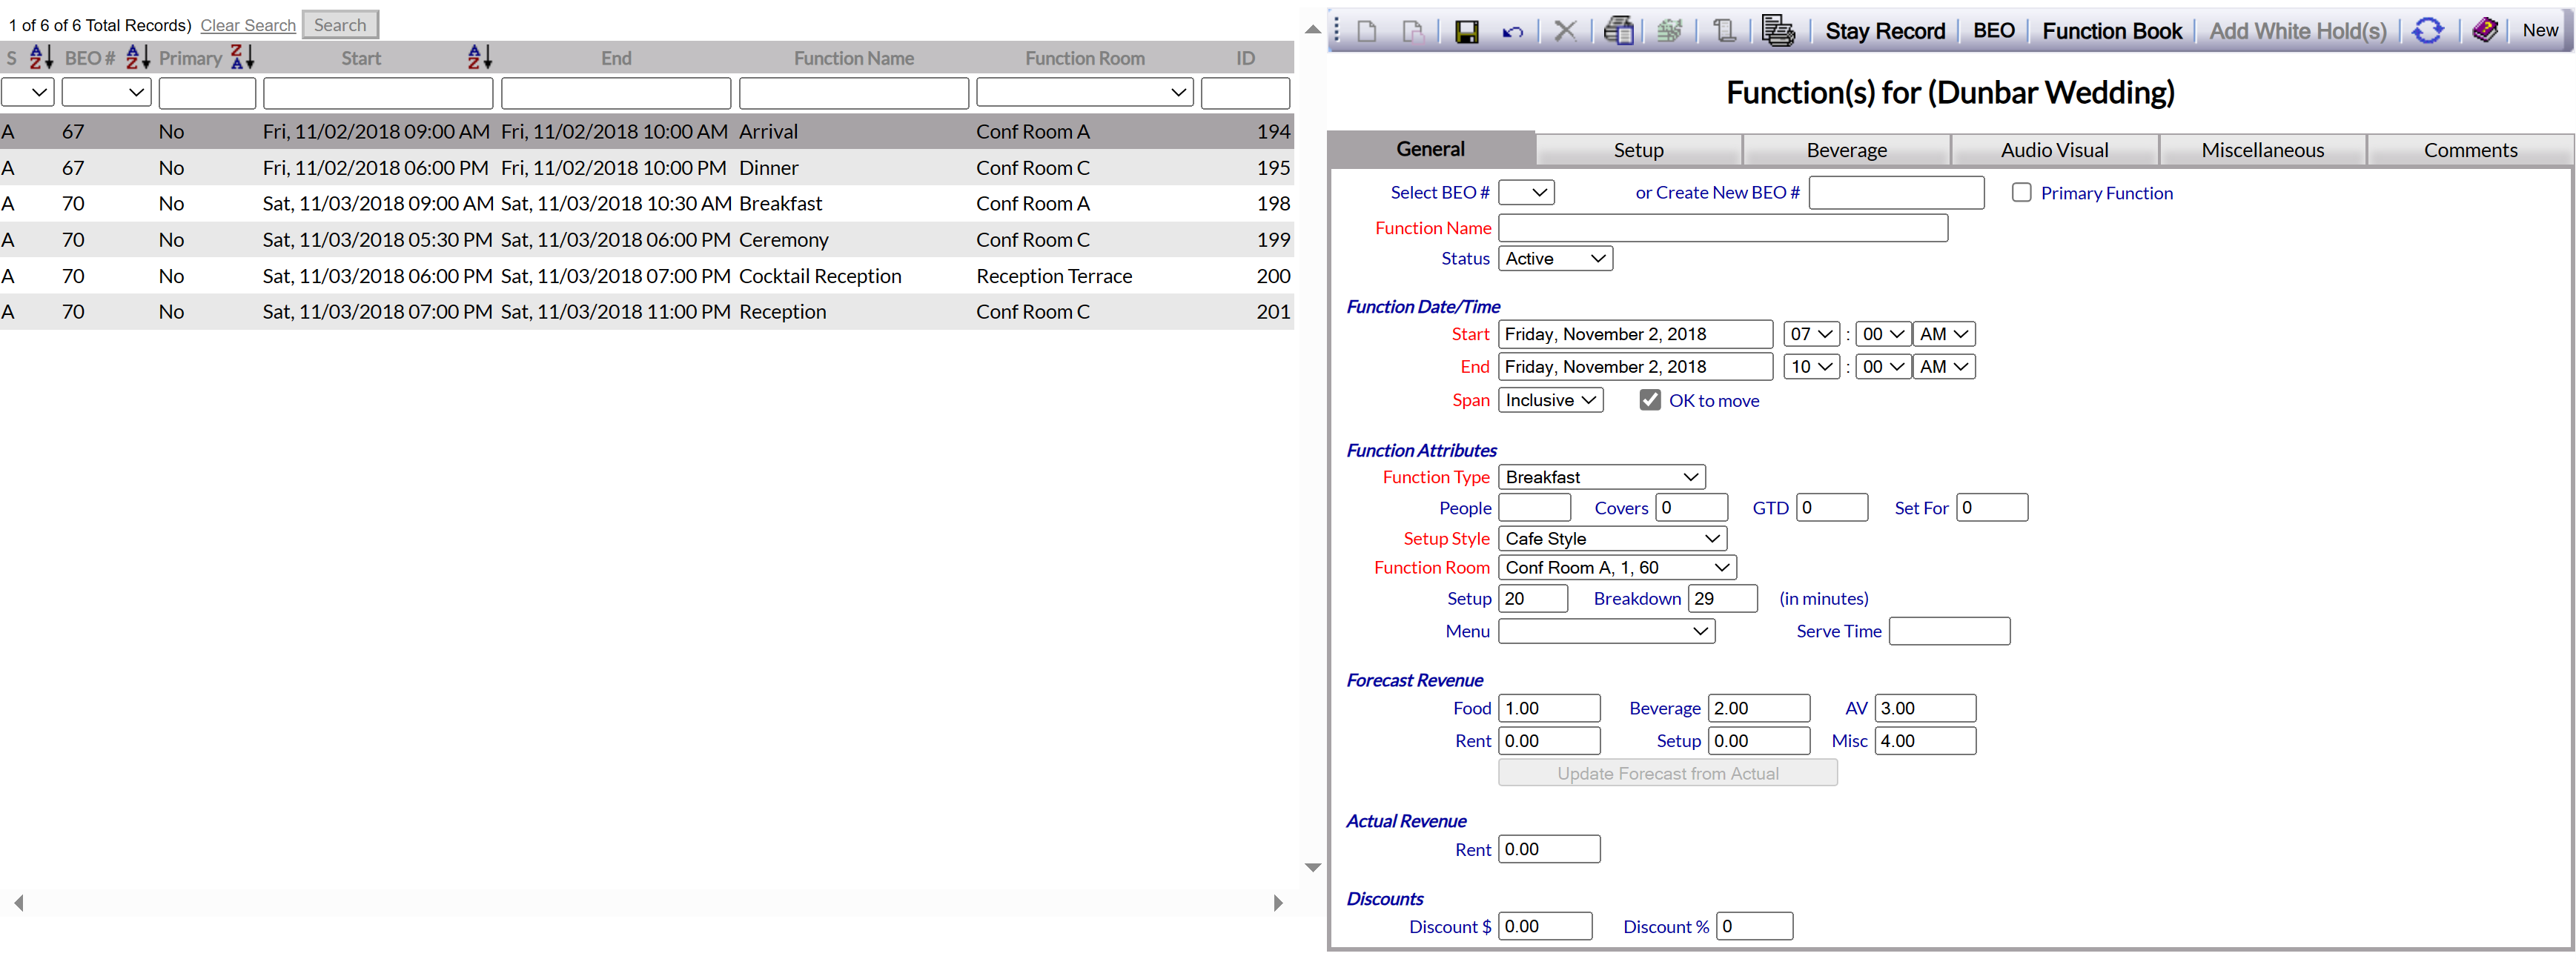
When opened, the Functions screen will display a list of any already configured Functions assigned to this Group Block on the left, and on the right side the fields you need to complete in order to add or edit a Function. (During the creation of a Group Block, the first time you open this screen, there will be no Functions displayed until you have generated and saved one).
All required fields for generating a Function are included on the General tab of the Functions screen, which is the tab automatically displayed when reaching the screen.
Select BEO or Create BEO #: You may choose to assign or create a new Banquet Event Order number to your Function.
Note: If none have been created yet, there will be none available to select from in the drop-down menu for the Select BEO option.
Primary Function: This check box may be checked or unchecked. If you wish this function to be assigned as the PRIMARY function for the BEO you should check this box. By default this box is unchecked. If this box is checked, the function will be shown as the first function in the grouping for the particular BEO (and grays the background of this function to indicate primary on any custom document).
Note: Only ONE function may be assigned as the primary function for any particular BEO number, no matter how many functions are grouped in the BEO.
Function Name: You MUST name your Function. It is suggested that this be as simple as possible, whilst still conveying all needed information.
This field is required.
Status: You may set the status of your Function, choosing between Active or Cancelled.
It is assumed that if you are creating a Function, the status will be active, and this is the default option. However, you CAN change this option to canceled, allowing you subsequently to remove a created Function WITHOUT DELETING it. This would mean that it could be re-instated at a later date if desired.
Function Date/Time section:
It is required that you complete the start and end DATE of the Function, as well as the start and end TIME of the Function, with hours and minutes, AM or PM.
To select the date, click on the field to show the calendar, and choose the appropriate date. By default, today's date is shown for both start and end date fields. You will need to adjust BOTH start and end fields independently (adjusting the start date does NOT change the end date field automatically).
To select the start and end time, use the drop down options to the right of the date fields to choose the desired hour and minute selections (minutes is divided into 15 minute increments only), then select either AM or PM.
Span: You may choose between Inclusive or Daily.
Inclusive means that the Function covers the WHOLE time (24 hours a day) covered in the specified Date span. Daily will include only the hours picked on the Dates span.
This field is required.
OK to move: This check box may be checked or unchecked. If checked, the Function may be moved from the room currently assigned to another, if needed. Do NOT check this box if the Function MUST be held in the assigned room only.
Function Attributes section:
Function Type: This is a drop-down menu of the configured Function Types available, select one.
This field is required.
People: You may enter the estimated number of people attending this Function, if known.
Covers: Number of chargeable covers for this Function. Enter a number if known.
Note: If this Group Block has a package attached to it, the cost (cover) may already be included there - in which case, you do not need to complete this field.
GTD: Number of guaranteed attendees. Enter a number if known.
Set For: Number of people to set up for. Enter a number if known.
Setup Style: This refers to how the furniture in the room is arranged (table positions etc). You will select from the drop-down menu of configured options.
This field is required.
Function Room: You MUST select a space for the Function to be held in. Again, You will select from the drop-down menu of configured options.
This field is required.
Your choice will be dependent on how many people will be attending the Function, the chosen set up and the size of your rooms at your Property.
Setup and Breakdown (in minutes): These fields refer to how long it will take you or your staff to prepare the room for the Function, and how long it will take to return it to its previous condition once the Function is complete.
These figures can be assigned to a particular Setup Style in your Sales and Catering area, in which case the number will be AUTOMATICALLY entered when the Setup Style is selected, but you may change them to anything you desire here (including 0).
Menu: Select a menu from the configured choices if a menu is needed for this Function. If not, leave blank.
Serve time: Food to be served at this time. If desired, enter the time that the food service (if any) should begin for this function.
Forecast Revenue section:
This section is important for REPORTING in your Skyware system, not in the actual set up of the Function.
Food, Beverage, AV, Rent, Setup and Misc all have fields which may be completed with estimates on how much will be charged for each category.
Update Forecast from Actual: This button, if clicked, allows the Function forecast numbers to be updated from the actual numbers.
Note: When setting up a NEW function, this button will be grayed out until the function has been saved to Skyware.
Actual Revenue section:
Rent: This is the charge for the room used for the Function. If it is covered in the Package charge, leave as 0.
For example, if you have a breakfast package the charge will be included there rather than here, with the Function being set up so that you have a space for the package to take place for all your Group member guests together.
Discounts section: Functions can now be discounted by a specific amount or percentage.
Note: The default discount posting type must be set up using the Posting Types maintenance screen. Ensure that the desired posting type has the check box next to the option "Default Discount Posting Type?" checked.
Discount $: If the discount for this function is to be applied as a specific dollar amount, enter the number in this box.
Discount %: If the discount for this function is to be applied as a percentage of the total cost, enter the number in this box.
Once you have completed the information in the General tab you should click the SAVE button in the tool bar. This will save the Function that you have just created and display it in the section on the left. Saving the Function will also attach it to the Group Block.
You may click it or any Function on the left to show the details on the right and edit the Function further. If you choose to edit the Function further, you can select any of the additional tabs on the Function screen to do so. (Options on the other tabs (to add items to the function) will NOT be available until the function has been saved to Skyware). These tabs allow you to specify the details of the equipment and contents of the room that may be added for the Function (so are important if known, but not critical in creating the Function), with their relevant charges.
The Setup tab allows you to add the furniture used in the set up of the room (tables etc), with a Fast Pick option listing the available options and their price - you can see how many are available, and enter the desired numbers to use. Select everything you wish to add in the Fast Pick screen before clicking the orange button Save and Exit to close the Fast Pick window and return to the tab, which will now list the added Setup items. The items available here may be configured using the Setup Inventory Items command in the Sales and Catering Configuration Menu.
Note: Using the Add button opens the "Setup Inventory Items for..." screen, which also allows you to add Inventory Items to the Function. This screen allows you to enter only one item type at a time, but also allows changes to be made to the information associated with the item (such as the description or price for this item) for this Function ONLY.
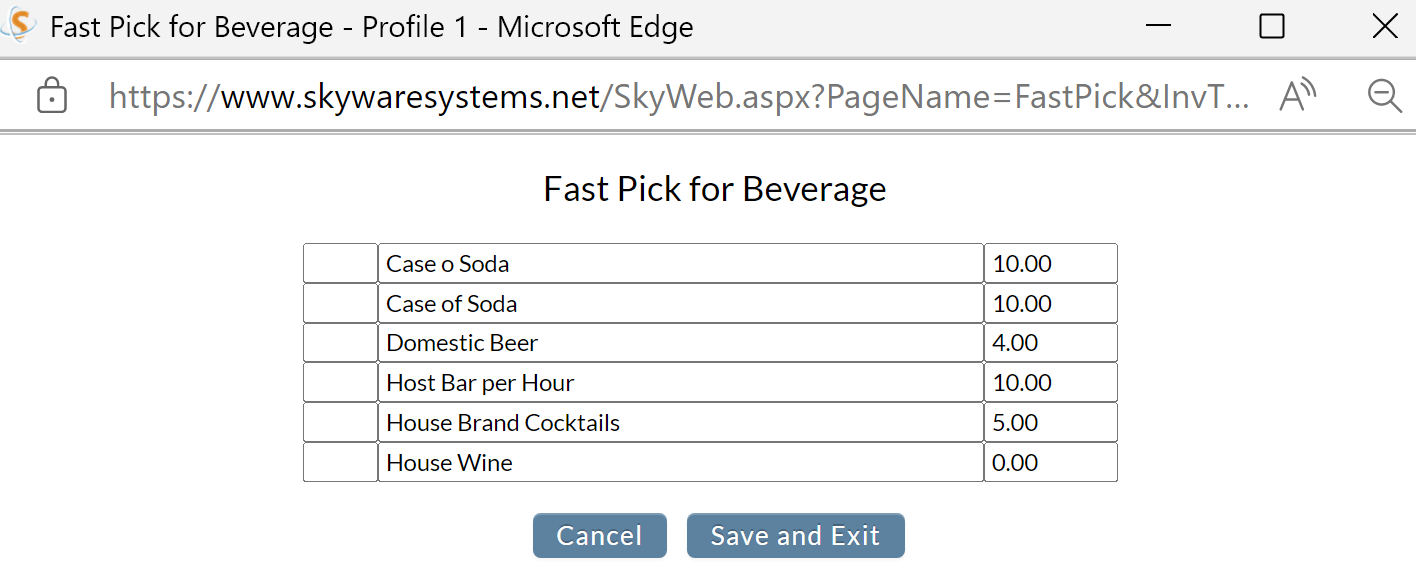
The Beverage tab allows you to specify what beverages may be available/provided by your Property with the room, with a Fast Pick for Beverage option listing those available to add (with the price per unit on the right). Select everything you wish to add in the Fast Pick screen before clicking the orange button Save and Exit to close the Fast Pick window and return to the tab, which will now list the added Beverage items. The items available here may be configured using the Beverage Inventory Items command in the Sales and Catering Configuration Menu.
Note: Using the Add button opens the "Beverage Inventory Items for..." screen, which also allows you to add Beverage Items to the Function. This screen allows you to enter only one item type at a time, but also allows changes to be made to the information associated with the item (such as the description or price for this item) for this Function ONLY.
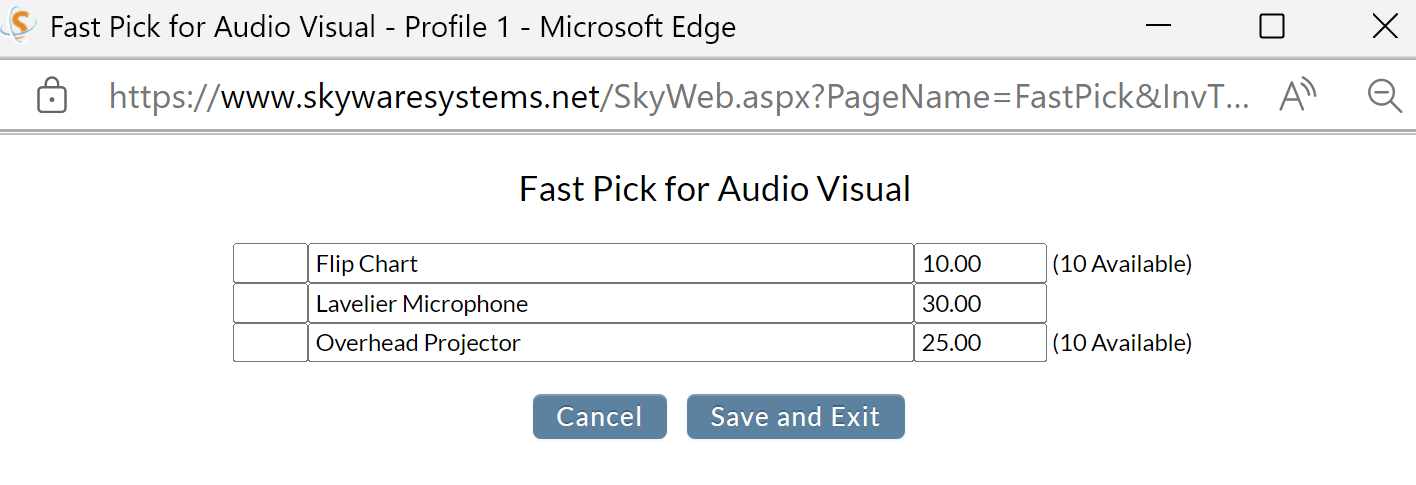
The Audio Visual tab allows you to specify what audio visual equipment may be provided from your Property with the room, such as a microphone or projector, with a Fast Pick option listing those available to add and their price. Select everything you wish to add in the Fast Pick screen before clicking the orange button Save and Exit to close the Fast Pick window and return to the tab, which will now list the added Audio Visual items. The items available here may be configured using the Audio Visual Inventory Items command in the Sales and Catering Configuration Menu.
Note: Using the Add button opens the "Audio Visual Inventory Items for..." screen, which also allows you to add Audio Visual Items to the Function. This screen allows you to enter only one item type at a time, but also allows changes to be made to the information associated with the item (such as the description or price for this item) for this Function ONLY.
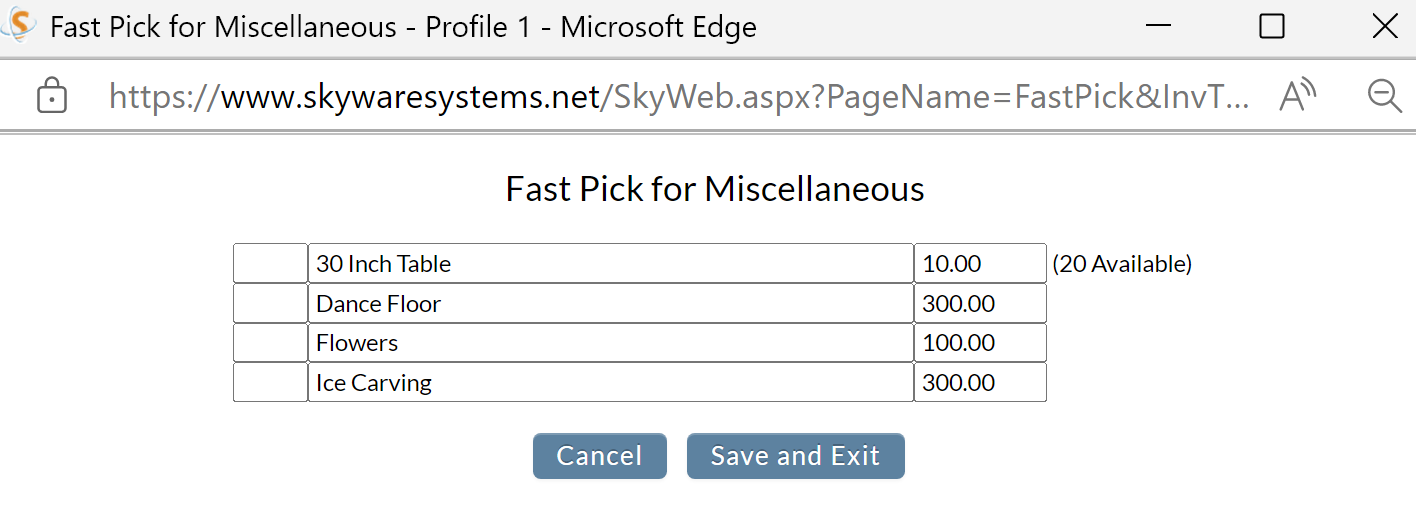
The Miscellaneous tab allows you to specify additional miscellaneous equipment that may be provided with the room, such as a dance floor, with a Fast Pick option listing those available to add and their price. Select everything you wish to add in the Fast Pick screen before clicking the orange button Save and Exit to close the Fast Pick window and return to the tab, which will now list the added Miscellaneous items. The items available here may be configured using the Miscellaneous Inventory Items command in the Sales and Catering Configuration Menu.
Note: Using the Add button opens the "Miscellaneous Inventory Items for..." screen, which also allows you to add Miscellaneous Items to the Function. This screen allows you to enter only one item type at a time, but also allows changes to be made to the information associated with the item (such as the description or price for this item) for this Function ONLY.
Once again, be sure to SAVE any changes you make to these tabs before leaving the Functions screen.


